Friday, July 31, 2009

White Chocolate Chip Oatmeal Cookies

White Chocolate Chip Oatmeal Cookies

These...are...delicious! I made these at least 3 times last year and I always found it incredibly hard to stop eating. There are just enough oats to give the cookies texture, and the amount of white chocolate and pecans are just right to make these cookies a sweet treat that you can't stop eating...well me anyway. lol. I am looking forward to making these again someday soon :)

White Chocolate Chip Oatmeal Cookies
from allrecipes

Ingredients

1 cup butter
1 cup light brown sugar
1 cup white sugar
2 eggs
2 teaspoons vanilla extract
3 cups all-purpose flour
1 teaspoon baking powder
1 teaspoon baking soda
1 teaspoon salt
1 1/2 cups rolled oats
2 cups white chocolate chips
1 cup chopped pecans

Directions

1. Preheat oven to 350 degrees F (175 degrees C). Lightly grease cookie sheets.

2. In a medium bowl, cream together the butter, brown sugar and white sugar until smooth. Stir in the egg and vanilla. Sift together the flour, baking powder, baking soda and salt, stir into the creamed mixture. Finally, stir in the rolled oats, white chocolate chips and pecans. Drop by tablespoons onto the prepared cookie sheets.

3. Bake for 10 to 12 minutes in the preheated oven. Remove from baking sheets to cool on wire racks.

Friday, July 24, 2009

Fudgy Brownies

This recipe turned out quite well for me. I think I made these twice last year! The only caveat for me was that they were just right bite sized otherwise I found the sweetness too much to handle..of course in general I'm finding I can't handle sweet in large doses anymore (darned aging!). So far, I don't think I've found a brownie recipe that tops these (yet!). Although I'm still looking to try out more. I think what I'm missing now is the right time/temp to make a chewy brownie. Mmm..so much to experiment with when I finish institute in August!

Brownies

Brownies

Fudgy Brownies
from Baking Bites

Ingredients

8 tbsp unsalted butter (1/2 cup)
4 oz unsweetened chocolate
1 1/4 cups sugar
1 tsp vanilla extract
1/4 tsp salt
2 eggs
1/2 cup all purpose flour
2/3 cup walnuts or pecans (optional)

Directions

1.Preheat the oven to 400F and line and 8-inch square metal baking pan with foil.
Melt the butter and the chocolate together, on top of a double boiler or in the microwave, stirring often until smooth.

2. Stir in sugar, vanilla and salt. Add eggs one at a time, followed by flour. Stir until very smooth, about 1 minute. Add nuts, if using.

3. Scrape batter into prepared pan and bake at 400F for 20 minutes.

4. Meanwhile, prepare a water bath. Fill a large roasting pan with water and ice about 1 inch deep.

5. When the brownies are done - and they will look a bit dry on top - take them immediately from the oven and place in the water bath. Add more ice to the water if necessary. Allow to cool completely in the bath before removing the pan and cutting the brownies. Store in an airtight container for up to 3 days.

Sunday, July 19, 2009

Gougeres

it did puff up!

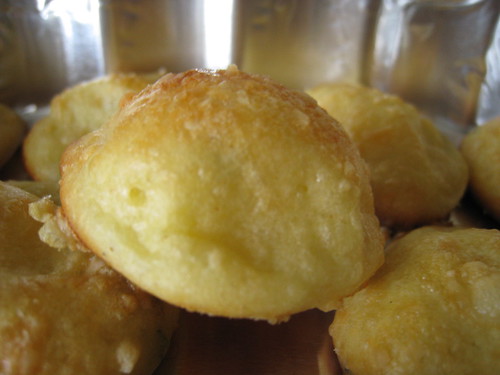
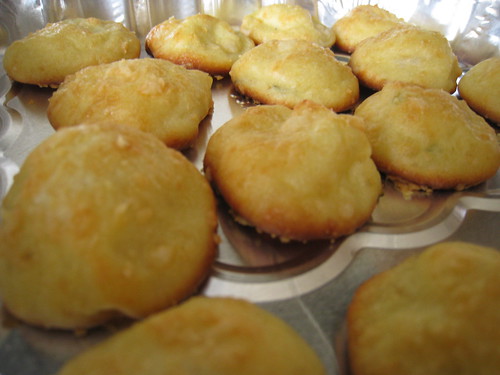
This was my first attempt at making these tasty cheese puffs! I found the recipe on David Lebovitz's blog and it looked so simple and he included lots of tips for troubleshooting so I couldn't wait to try :) I used a combination of gruyere and parmesan as my cheeses and seasoned the puffs with some black pepper and lemon thyme. mmmm. Sadly, I soon realized I need a lot more experience working with choux pastry... My puffs deflated pretty quickly after they came out of the oven. They were tasty, but not "puffs" which might have been due to underbaking :( Sigh. I think I also had issues with how much batter to put out for one puff. These turned out about half the size of what they were supposed to, judging from the original recipe.. I'm definitely going to give these another shot and conquer choux pastry! These and also cream puffs...mmm cream puffs... but those'll have to wait another few weeks until I have an oven to work with!

Gougeres

Gougeres
adapted from David Lebovitz definitely hop over and visit his site for tips and more :)

1/2 cup (125ml) water
3 tablespoons (40g) butter, salted or unsalted, cut into cubes
1/4 teaspoon salt
a few turns of freshly-ground black pepper
1/2 cup (70g) flour
2 large eggs
1 to 2 teaspoons minced fresh lemon thyme
1/2 cup grated gruyere
1/4 cup grated parmesan


1. Preheat the oven to 425F (220C.) Line a baking sheet with parchment paper or silicone baking mat.

2. Heat the water, butter, salt, and pepper in a saucepan until the butter is melted.

3. Dump in the flour all at once and stir vigorously until the mixture pulls away from the sides into a smooth ball. Remove from heat and let rest two minutes.

4. Add the eggs, one at a time, stirring quickly to make sure the eggs don't 'cook.' The batter will first appear lumpy, but after a minute or so, it will smooth out. (You can transfer the mixture to a bowl before adding to eggs to cool the dough, or do this step in a food processor or electric mixer, if you wish.)

5. Add about 3/4s of the grated cheese and the thyme, and stir until well-mixed.

6. Scrape the mixture into a pastry bag fitted with a wide plain tip and pipe the dough into mounds, evenly-spaced apart, making each about the size of a small cherry tomato.

7. Top each puff with a bit of the remaining cheese, the pop the baking sheet in the oven.

8. Bake for 10 minutes, then turn the oven down to 375F (190C) and bake for an additional 20 to 25 minutes, until they're completely golden brown.

Eats around A2, part 3

And the final installment of my eating adventures in Ann Arbor!

R, C, and I had a farewell brunch at Cafe Zola which was amazingly delicious. I believe R said she liked both Cafe Zola as well as Angelo's and C and I hadn't tried Cafe Zola before we marked that as our destination for the day :) R and C both had the strawberry and banana crepe and I had the Istanbul omelette. The crepes sounded so tempting but savory wins over sweet for me when it comes down to brunch. The omelette was delicious, there was eggplant and other vegetables inside the fluffy egg, topped with a chunk of feta cheese. mmm...so good! Needless to say, if I were still in A2, I'd be going back there :)

Istanbul Omelette
Istanbul Omelette

Inside the omlette
Inside the omelette!

Strawberry and banana crepe
Strawberry and Banana Crepe

The RF research team and I had a farewell lunch at Sadako during my last week in A2. It was somewhat fitting since I think the first time I visited A2, my cousin and her family took me out there for dinner! I had the U of M lunch set which was 3 pieces of salmon nigiri and 6 pieces of California rolls topped with salmon. Mm I love salmon.. it was decent and pretty good for the price, also much more filling than it looks, as sushi always is. Sadako is definitely a decent alternative from Za's, Jimmy John's, and other places around S. University, and E. University.

U of M lunch set @ Sadako

On my very last night in A2, E was kind enough to respond to my distress call and come over after lab to help me clean my apt. We were at it for a good 2-3 hours! Thank goodness for friends is all I have to say :) To close out the night, at 11pm we ordered a bacon, chicken, and pineapple Sicilian deep dish pizza with a cajun butter crust from Cottage Inn. I couldn't leave A2 without trying pizza from the chain that first opened there! Pizza after working hard at scrubbing the bathroom, kitchen, floors, etc tastes divine... We had great fun sitting on the floor of my kitchen/dining room, using the pizza box and paper towels as plates, huddled around my comp listening to music and looking at my old photos. I like that when I have pizza, it usually comes with that laid back and relaxing atmosphere :)

Pizza!

I must say, looking back on it, I had a pretty good time in Ann Arbor, despite many stressed-filled nights and the incredibly long winter. I only wish I got to explore more of the eats while I was there!

Friday, July 17, 2009

Chocolate Chocolate Mint Cookies

I made these last year in an attempt to make delicious chocolate chocolate cookies since I have yet to find a go to recipe for these. I also wanted to use my homemade mint chocolate chips that I made from a Ghirardelli Mint Bliss chocolate bar I got from work. I made the mint chips by simply melting the chocolate bar and then dropping drops using a spoon onto my silpat. So simple! The cookies turned out ok, I don't remember them being mind-blowingly spectacular, but they were decent and had a strong mint flavor due to the chips. I'll definitely be trying out other chocolate chocolate cookie recipes but I think I'll give this one another shot as well, without the mint lol. They did turn out quite soft and yummy.

Home Made Chocolate Chips

Chocolate Chocolate Chip Cookies

Chocolate Chocolate Mint Cookies
adapted from allrecipes

Ingredients

1 cup butter, softened
1 1/2 cups white sugar
2 eggs
2 teaspoons vanilla extract
2 cups all-purpose flour
2/3 cup cocoa powder
3/4 teaspoon baking soda
1/4 teaspoon salt
2 cups mint chocolate chips
1/2 cup chopped walnuts (optional)

Directions

1. Preheat oven to 350 degrees F (175 degrees C).
2. In large bowl, beat butter, sugar, eggs, and vanilla until light and fluffy. Combine the flour, cocoa, baking soda, and salt; stir into the butter mixture until well blended. Mix in the chocolate chips and walnuts. Drop by rounded teaspoonfuls onto ungreased cookie sheets.
3. Bake for 8 to 10 minutes in the preheated oven, or just until set. Cool slightly on the cookie sheets before transferring to wire racks to cool completely.

Sunday, July 12, 2009

Eats around A2, part 2

During my last few weeks in A2, E and I started having pretty regular walks 2-3 times a week. We'd either cook something at my place and then walk a few miles or go out to central campus to get dinner and then walk back to north campus. The last few times we met up, we made dumplings and we also went to TK WU for dinner! Ok so we went twice but I found it pretty good and satisfying for Chinese food in A2 :) The service was also not bad and we even got free dessert once :D

The first time we went, E had Rice and Roast Duck and I got the Rice with Chinese Beef Stew. I didn't try any of E's but mine was quite good..of course it helps that I <3 beef tendon lol.

Roasted Duck + Rice
Rice and Roast Duck

Beef + Tendon stew over rice
Rice and Chinese Beef Stew

The second time we went, we shared two dishes: Hunan Chicken and Kung Pao Tofu. Both were spicy, especially to me who is sadly very weak when it comes to spicy food. But nevertheless I thought they were good, but I preferred the tofu to the chicken though. There's just something about tofu that's crispy on the outside and yet still soft on the inside. Oh the wonders of frying lol. We were also pleasantly surprised when they gave out bowls of mango ice to everyone that night for dessert :)

Hunan Chicken
Hunan Chicken

Kung Pao Tofu
Kung Pao Tofu

Mango Ice
Free mango ice!

Ok, well that's it for now. I think I have one more update and then I'll be done with A2 food...sadly. I wish I had gone out to eat more often :(

Friday, July 10, 2009

Rustic Spinach Feta Bread

This was my first attempt at baking bread, and I think it turned out quite well! I came across it on Baking and Books It was nice an chewy and I think the cheese added a good flavor to the bread as well. Slices slathered with butter is also recommended lol. Too bad my subsequent tries at baking bread hasn't been as successful..I guess it's that "first time's the charm" jinx hitting me ::sobs:: But I digress. This is an easy bread to make and the results are absolutely worth it!

Rustic Spinach Feta Bread

Rustic Spinach Feta Bread

Rustic Spinach Feta Bread recipe here: Baking and Books

Friday, July 3, 2009

Red Velvet Cake in a Cone!

I don't remember where I first saw this but I remember thinking cakes in cones was a brilliant idea :D That and having never made red velvet cake before, I had a project on my hands XD They were so easy to make and unlike many ice cream cones where you're left with cone and..air towards the bottom, there was cake allll the way down! The only thing I regret was not having sprinkles to top off the little cones :)

Sadly, I don't remember what adjustments I made for time and/or temperature (it was over a year ago >_<) so definitely check your cake if you're using this recipe...or refer to the original recipe linked below and adjust from there, sorry!

Red Velvet Cupcake in a cone

Red Velvet Cake Cone
adapted from allrecipes

Ingredients

Ice cream cones (sorry I don't remember how many!)
1/2 cup shortening
1 1/2 cups white sugar
2 eggs
2 tablespoons cocoa
4 tablespoons red food coloring
1 teaspoon salt
1 teaspoon vanilla extract
1 cup buttermilk
2 1/2 cups sifted all-purpose flour
1 1/2 teaspoons baking soda
1 tablespoon distilled white vinegar

Directions

1. Stand ice cream cones in a regular muffin pan, using aluminum foil to support the cones and prevent them from falling. Preheat oven to 350 degrees F (175 degrees C).

2. Cream shortening and 1 1/2 cups sugar WELL. Add eggs and beat well.

3. Make a paste of cocoa and red food coloring. Add to creamed mixture. Mix salt, 1 teaspoon vanilla and buttermilk together. Add alternately the flour with the milk mixture to the creamed mixture. Mix soda and vinegar and FOLD INTO CAKE BATTER. DON'T BEAT OR STIR NOW.

4. Pour batter into cones,leaving about a centimeter between the batter and the brim of the cone. Bake for 20-25 minutes.

5. While cones cool, prepare dipping chocolate or candy to decorate cones. Once cones are cooled, dip the top of the cake into the melted chocolate or candy and decorate as you like :)