Friday, January 23, 2009

Lazy Friday

I had planned to wake up early, get my paper done, and get cracking on readings for next week's classes. Of course, things never go as planned for me since my inherent laziness takes over and what ended up happening was I woke up around 8:30, browsed food blogs, watched some variety shows I downloaded, finished my paper 3 hours before it was due, browsed more food blogs, watched more variety shows on youtube, and then ate dinner. In that order. I had to do something that .. wasn't watching things on my computer, so of course I decided to bake! I had leftover cinnamon sugar from making the palmiers last week so I naturally decided to make snickerdoodles :) I love these cookies. They come out soft and so delicious!

I've used this recipe before so I know they turn out well. This time I tweaked the method just a little bit since the cinnamon sugar mix I had on hand was heavier on the sugar side than cinnamon. The cookies turned out with a light hint of cinnamon with a soft center and slightly crispy and chewy sides, mm delicious! On most days, I usually prefer the stronger cinnamon flavor in snickerdoodles, but today the light flavor really hit the spot :) I was probably just looking for a sweet end to the day lol! The only thing I'd try differently next time is to use all butter and no shortening.

Snickerdoodles

Snickerdoodles
Adapted from Allrecipes

Ingredients

1/2 cup butter, softened
1/2 cup shortening
1 1/2 cups white sugar
2 eggs
2 teaspoons vanilla extract
2 3/4 cups all-purpose flour
2 teaspoons cream of tartar
1 teaspoon baking soda
1/4 teaspoon salt
4 tablespoons white sugar
1/2 teaspoons ground cinnamon

Directions

1. Preheat oven to 400 degrees F (200 degrees C).
2. Cream together butter, shortening, 1 1/2 cups sugar, the eggs and the vanilla.
3. Blend in the flour, cream of tartar, soda and salt in a separate bowl and then mix into the wet ingredients. Shape dough by rounded spoonfuls into balls.
3. Mix the 4 tablespoons sugar and the cinnamon. Roll balls of dough in mixture and then roll balls between your hands again. Roll balls one more time in the cinnamon sugar mixture. Place 2 inches apart on parchment paper lined baking sheets.
4. Bake 8 minutes or until set but not too hard. Be careful to not underbake these cookies. Let cookies sit on the baking sheet for 1-2 minutes before removing to a rack to cool.

Saturday, January 17, 2009

Celery...cookies?

So F suggested that I try making cookies with celery a while back and I've been stewing over ways to infuse celery into cookies. The first thought was to try making a sugar cookie with celery in it. My first thought was to use some sort of celery extract or juice in the dough itself and then roll balls of dough in a celery infused sugar before baking. It all sounded nice and pretty in my head, but upon trying to create this masterpiece, I discovered things don't go as well as planned all the time :X The celery sugar turned out very light in the celery flavor and I hadn't realized that I don't have a food processor, juicer, or blender to extract the liquid from the celery, so I ended up making a celery syrup by boiling celery in water and sugar. The result was a sweet syrup with a semi-strong celery flavor that came after the sweet, but that celery flavor wasn't strong enough to come out through the dough. I didn't anticipate that and even reduced the amount of sugar from the original sugar cookie recipe to accommodate for the syrup. Needless to say this was a complete failure. There was no celery flavor to the cookies, and they were not as sweet as regular sugar cookies. In fact, most of what I tasted was vegetable oil (bleh). Next time I'll stick to tampering with a recipe that I've tried before and stay away from oil :X Also, I'll wait till I have access to some sort of juice extracting contraption before thinking about making more celery cookies. Either that or I'll start experimenting with celery seeds...

celery cookies

Friday, January 16, 2009

Palmiers <3

I love cinnamon in cookies, in buns, in desserts and sweets in general, so of course I had to make these cinnamon palmiers when I saw them on i shot the chef. I actually made these once before over winter break and found out how long they actually take to make with all the resting in between but they are definitely worth the effort.

I really enjoyed these cookies, as did my friends and my cousin! Thus, I had to make them again! Of course it helped that S wanted to try them and didn't get any since he ran off to HK so I had reason to make these again :) The first time, I didn't really know what I was doing when I was folding the dough and making the cookies, and this time..despite having one batch under my belt, they were just as hard to shape again. I'm guessing it's because I keep halving the batches. Next time I'll do a full batch :) I also need to work on rolling them out and stuffing lots of cinnamon sugar into them too. They seemed to be lacking in the cinnamon sugar flavor this time =/ But they flaky buttery cookie is good..because of the flaky buttery-ness...:X

palmiers take two
Sigh..they were much too pale..

palmiers take 2
In the tupperware to be sent to S lol

Recipe can be found here: A Cheap Cookie

Pina Colada Cake

Last weekend, I had a friend over and, being girls, of course we loaded up on the sweets at the grocery store before heading to my place. That meant cinnamon rolls, donuts, chocolate, juice, and a small bag of goldfish crackers to offset the sugar for lunch! We also got a couple cartons of juice. Needless to say we couldn't finish it all. Not even half. So last week I was eating donuts and cinnamon rolls instead of real food..but that's not the point here. What I'm trying to get at is that I was left with a carton of pina colada juice (new from Dole apparently!) unopened and sitting in my fridge. I'm not a huge juice drinker, so I've been drinking it (diluted with water) and kept thinking of how I could use the juice in my baking. I've had a hankering for pound cake, so I thought I'd flavor the cake with juice! Perfect!

The results? Well, I tinkered with a recipe I found on Baking Bites and then went and glazed one half of the cake while leaving the other half untouched. The verdict? I like the crunchy crust on the cake! The plain cake is quite tasty although the pina colada flavor doesn't really come out. I would recommend toying with reducing the amount of sugar and increasing the amount of juice to fix that. It is acutally sweeter than I thought it would be as well but it is a nice dense, yet pleasant pound cakey cake. Then I tried the glazed version. Glaze wins hands down. The pina colada flavor was there but not overpowering. The glaze does make the cake sweeter, but I have a sweet tooth and I'm ok with that! However, I do recommend small portions for this cake. I actually like them nice and bite-sized :) I imagine they'd go well with tea or coffee as well.

Glazed side
glazed half

unglazed side
unglazed half- see that crack in the back? I broke the cake when I inverted it ::tears::

look at that tight crumb!
oh so delicious! the glazed piece is the one that glistens! lol

Pina Colada Cake
adapted from Baking Bites

1 cup sugar
2 1/2 tbsp butter, soft
2 large eggs
1 tbsp Pina Colada juice
1 1/3 cups all purpose flour
2 tsp baking powder
1/4 tsp salt

for glaze:
powdered sugar
Pina Colada juice

Preheat the oven to 350F and grease and flour a 9x9 pan.
In a large bowl, cream the sugar and butter until light and crumbly, then beat in the eggs one at a time, followed by the pina colada juice.
In a small bowl, stir together the flour, baking powder and salt, then stir the flour mixture into the wet mixture. Stir only until just combined.
Pour into the prepared pan and bake for 20-24 minutes, or until a toothpick comes out clean when inserted into the center of the cake and the top is golden brown.
Invert cake out onto a rack to cool.

*If using glaze, mix powdered sugar and juice to make the glaze. The glaze should be a slightly thick but liquid consistency. I started with about 2-3 tbsp of juice and kept adding powdered sugar until I reached my desired consistency. Brush the glaze on to the cake while still warm or drizzle glaze on after the cake is completely cooled. Either way is delicious (and sweet!)

Home Cookin'

No recipe for this post, but I thought I'd post about what I typically cook for myself. I tend to just stir fry whatever I have in the fridge since it's fast and easy and I really don't have a picky palate so if it's edible, I'll eat it :X

That said, this post is about a fried potato dish that my grandmother (best cook EVER) used to make when we were young. My brother and I used to fight over the last piece of potato and even now we're on an unending quest to figure out how my grandmother used to cook this. Sadly, she passed away 16 years ago, long before I became interested in cooking and baking, so the only clues we have to go on is what my dad remembers of how she used to cook and my brother's picky taste to try and figure out the proportions.

This dish is very, very simple, it's basically sliced strips of marinated pork that's fried with strips of potato and/or onion. Very simple, very quick, and I find it tasty. Of course I tend to find almost anything fried with soy sauce tasty...so it might just be me. Anyhow, there'll be no recipe since it's not quite how it should be yet and, well let's face it, it's so simple it really doesn't require a recipe to imitate anyway!

potatoes and pork

Thursday, January 15, 2009

A Taste of the Caribbean

Mmm..sometimes being a graduate student isn't so bad! Rackham had a Food for Thought event today with the aim of introducing students to Caribbean food. Of course graduate students love food- especially the free variety- so tons of us registered and showed up for this event that promised us dinner lol. I've never had Caribbean food before so I didn't know what to expect. I have to say I absolutely <3ed the jerk chicken...mmm....but let me first describe what we were offered.

The night was catered by Irie, a Caribbean restaurant in nearby Canton, MI. The owner is Jamaican so I imagine that the food might be more Jamaican than any other Caribbean cuisine, but I might be wrong :X Anyhow, we had rice and peas, curried goat, curried chicken, curried vegetables, jerk chicken, fried plantains, and cut pineapple. The jerk chicken was SO GOOOD. OMG DELICIOUS. The owner gave a short talk about the food before we all stampeded over to the tables and he said that they used 20+ spices in the marinade for the chicken and let it marinate overnight before sticking into the oven (I think he said you can also grill it). SO DELICIOUS. That and the fried plantains and I was set for the night. Someday I'll have to figure out a good jerk spice combination and make my own...and fry me some plantains. mmm plantains.

Jamaican food

Friday, January 9, 2009

Izakaya Sanpei

It was C's birthday today so 4 of us went all the way out to Canton for Japanese to celebrate her big 2-3 (so young!) Anyway, so this was the first time I've had Japanese out here in the midwest and I have to say it was better than I expected lol.

We started out with a chicken teriyaki + tempura combination dinner. This was pretty standard, not blow-me-away amazing but not bleck terrible. I liked how the teriyaki sauce they used on the chicken wasn't your standard sticky teriyaki. Tempura is always great...who can say no to deep fried shrimp and vegetables? :)

chicken teriyaki
chicken teriyaki with potatoes and green beans on the side

tempura
tempura

We also ordered a red dragon roll (basically a dragon roll but with tuna instead of eel), a sumo roll (it had eel and other fish), and a 007 roll (it had shrimp tempura, eel, some other stuff...topped with unagi sauce it seemed like) as our rolls. They were..ok. I think the best of the three was probably the 007 roll.

red dragon roll
red dragon roll

Sumo Roll + 007 Roll
sumo roll + 007 roll

The highlight of the night though was the kamonabe (duck hot pot). Mmm the broth was delicious. C said they probably used duck broth and we all tasted some mushroom in it too but it was very flavorful and K wanted to drink all of it lol. I'm coming to love hot pot lol. There's no photo of it but we topped off the hotpot with 2 servings of udon, just like the Japanese do :) It was yummy!

Kamonabe!

For dessert, (of course we couldn't say no to dessert!) we got the 4 flavors of ice cream they had to offer. We also asked them to do a happy birthday thing for C, which they happily agreed to do :) So we had a plate of grapes and oranges, green tea, red bean, and vanilla ice cream, and a scoop of orange sherbet to bring us into food coma bliss.

dessert!

I have to say it was an enjoyable night out with great company, good service, and decent food :)

Wednesday, January 7, 2009

Rocky Road Brownies & Candied Pecans

I'd like to say that I'm commemorating the beginning of a new blog with a double post of recipes but really, I promised to (well sort of) send these two my two partners in crime (I'd call them my two better halves, but then that'd mean I'm just a squishy blob..wait..let's not go there) in SD and I wanted to make them before I started classes.

The rocky road brownies are delicious brownies that A of Buttered BlasphAmy made over the summer. H fell in love with them and prodded me into getting the recipe from A and I thought it was only appropriate that I make these and send them to H for her birthday next week!
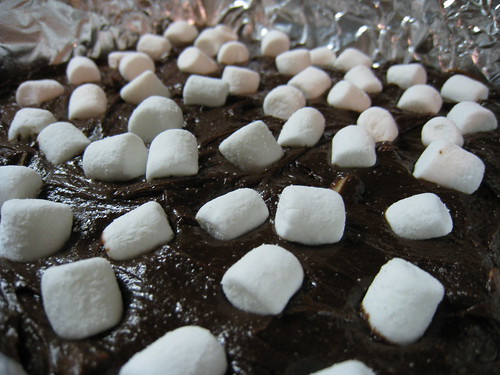
Rocky Road Brownies
before baking

Rocky Road Brownies
all done :)

The candied pecans come from a recipe I found on allrecipes.com that I made over winter break. My brother couldn't stop eating them and neither could a good number of my friends who came over Thanksgivmas (yes, we combined Thanksgiving and Christmas into one random Friday night in December lol). I have to say I'm not a huge fan of pecans, but these I couldn't keep my hands off of these either. I only made the regular version here, but I also made a small batch with Splenda for my diabetic father and my mother actually enjoyed that version more than the original. I found the batch with Splenda had a more salty overtone than sweet and preferred the original, but nevertheless my father found it necessary to hide the small tupperware full of the Splenda coated pecans to keep my mother from devouring them all while he was out! But I digress..I intended on making these again while I was at home so my beloved F could try some since she couldn't come to Thanksgivmas and I raved about them to her, but I didn't have time to. Luckily, I found extra egg whites in my freezer when I got back to Michigan and now she's getting her own box full of them to munch on at her new job XD

Candied Pecans
mmm delicious

Rocky Road Brownie Bites

1/2 cup butter
4 ounces unsweetened chocolate, chopped
2 eggs
1 cup sugar
1 teaspoon vanilla
1/4 teaspoon salt
1/2 cup all-purpose flour
1/4 cup blanched almonds, chopped or slivered almonds
24 mini-marshmallows

Equipment: Mini-muffin tin or regular
Preheat oven to 350 degrees F.

Over hot water in a small bowl, melt the butter and chocolate together. Let cool to almost room temperature while you prepare the rest of the recipe.

In a mixer or with a whisk, whip the eggs with the sugar until fluffy. Stir in the vanilla and salt with a wooden spoon. Add the melted chocolate mixture and stir. Add the flour and stir in only until incorporated. Add nuts and mix briefly.

Grease a non-stick mini muffin (or regular) tin and divide the batter evenly by spoonfuls filling each 3/4 full. Top each with a mini marshmallow, pressing it in slightly. Bake for 20 minutes for chewy brownies and 25 minutes for cake-ier brownie bites. Let cool then ease them out of the pan.

*I didn't have a mini muffin pan so I lined a 9x9 pan with foil and baked them for 25 minutes and the edges came out done and the middle quite fudgey- actually I tried these after they cooled and they're more underdone than I prefer, so for chewier brownies I'd recommend trying 30-35 minutes.

Candied Pecans
adapted from: http://allrecipes.com/Recipe/Sugar-Coated-Pecans/Detail.aspx

2 egg whites
2 teaspoons water
1 teaspoon vanilla
1 pound pecan halves
1 cup white sugar
3/4 teaspoon salt
1/2 teaspoon ground cinnamon

1. Preheat oven to 250 degrees F (120 degrees C). Grease one baking sheet.

2. In a mixing bowl, whip together the egg white and water until frothy. In resealable gallon-sized bag, mix together sugar, salt, and cinnamon.

3. Add pecans to egg whites, stir to coat the nuts evenly. Remove the nuts, and toss them in the sugar mixture until coated. Spread the nuts out on the prepared baking sheet.

4. Bake at 250 degrees F (120 degrees C) for 1 hour. Stir every 15 minutes.

First Post!

Yay! New blog!

I've been trying out different recipes here and there (mostly sweet and baked!) and I finally decided to start keeping a record of them :) I'm also hoping to try more savory recipes in an attempt to add more variety into my diet. Look forward to rants, raves, and all that good stuff that will come out of my experiments in the kitchen :)